Script in python for archicad 101
This article follows the Introduction to the use of the Archicad-Python connection.
This first script is directly taken from the tutorial of Tibor Lorántfy, a former developer at graphisoft :
https://archicadapi.graphisoft.com/getting-started-with-archicad-python-connection
This first script will display in the archicad console the number of walls in the project.
I will first show you a "raw" version of this script, then the optimal version as proposed by Tibor, and finally propose a graphical interface (very light) with Tkinter.
Let's start!
Sommaire
"raw" version
This version is proposed to better explain the methodology, but it is not at all recommended. This is the script written with the minimum number of lines possible.
It is done... in 3 lines!
from archicad import ACConnection
walls = ACConnection.connect().commands.GetElementsByType('Wall')
print('Nombre de murs: ' + str(len(walls)))
1st Line Analysis
from archicad import ACConnection
Generally speaking, a python script does not load all the functionality allowed by python, and it is necessary to indicate the additional modules that you wish to integrate at the beginning of the script.
It can be a module allowing to work with excel files (for example openpyxl):
from openpyxl import Workbook
It can also be a module allowing to create a graphic interface (for example Tkinter):
from tkinter import *
They can be modules allowing to use images, create randomness, etc, etc.
These modules are sometimes already integrated in the basic installation of python and do not require additional installation, but must still be called (this is the case of the graphical interface Tkinter), and sometimes it is necessary to have previously installed this additional module.
In our case, this first line is absolutely necessary for all python scripts for archicad: It tells python to load the python/archicad module installed on the computer which will allow access to all commands dedicated to archicad.
2nd Line Analysis
walls = ACConnection.connect().commands.GetElementsByType('Wall')
In this second line, we create a variable named "walls" and we use the command to get all the elements created with the wall tool. I have drawn in my archicad file 4 walls on the ground floor.
The command to retrieve the elements according to their type
To get all the walls of the project we will use the command GetElementsByType().
To get more information about this function you can either go to the python site for archicad: https://archicadapi.graphisoft.com/archicadPythonPackage/archicad.releases.ac24.html#archicad.releases.ac24.b2310commands.Commands.GetElementsByType
or go to Visual Studio code:
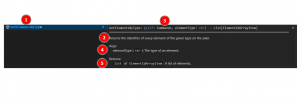
In Visual Studio Code, we have:
- the name of the command (1),
- what it does (2)
- the type of function (3): a command,
- the type of argument to be put between the () and in what form (4): here a string indicating the type of the element. So you have to write the type between two quotation marks " ".
- the result that will be returned (5): a list of type "ElementIdArrayItem".
How to launch the command?
If we follow the previous part we must therefore write:
GetElementsByType("Wall")
To launch this function, however, you need to add some information:
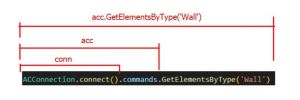
We tell python that we want to use the python module for archicad (1), then that we want to connect to archicad (2), that we want to use a command (3) and finally which command we want to use (4).
The result obtained with the 2nd line
We have created a walls variable that retrieves the result of the GetElementsByType() command
If we used the "print" function to see what the "walls" variable retrieves, it would look like this:
[ElementIdArrayItem {'elementId': {'guid': '86E4F938-8783-4E1C-881E-91C60E902526'}}, ElementIdArrayItem {'elementId': {'guid': 'E794D806-E94C-49D1-9854-A238F49D4AE3'}}, ElementIdArrayItem {'elementId': {'guid': 'B848DBB3-E432-4AEE-8AD1-A8FB0F559BBE'}}, ElementIdArrayItem {'elementId': {'guid': 'FF09403B-BA6D-43D3-B936-6C44AD229F85'}}]
It is "almost" JSON. If we "clean up" this answer a bit to turn it into JSON we get this:
{
        "elements": [
            {
                "elementId": {
                    "guid": "86E4F938-8783-4E1C-881E-91C60E902526"
                }
            },
            {
                "elementId": {
                    "guid": "E794D806-E94C-49D1-9854-A238F49D4AE3"
                }
            },
            {
                "elementId": {
                    "guid": "B848DBB3-E432-4AEE-8AD1-A8FB0F559BBE"
                }
            },
            {
                "elementId": {
                    "guid": "FF09403B-BA6D-43D3-B936-6C44AD229F85"
                }
            }
        ]
    }
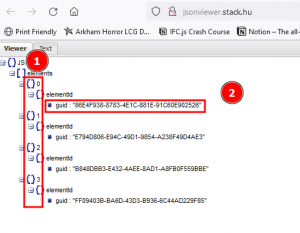
Schematically, this is what it looks like:
This means that we have a list of 4 values (our 4 walls), going from index 0 to index 3 (which corresponds to the 4 walls: wall index 0, wall index 1, wall index 2, wall index 3 )
This notion of index (in 1) on the schema is not explicitly indicated in the JSON format, it is an automatic attribution: the first value is assigned index 0, the second index 1, etc... Like a python list.
To each of these elements is associated a GUID: it is a unique identifier generated by the software that allows to find this element. This identifier remains constant and will not change.
So we obtain a list of 4 unique identifiers (GUID) corresponding to the 4 walls of the project.
3rd Line Analysis
print('Number of Walls: ' + str(len(walls)))
This third line is the simplest, it is pure python, and very basic.
The len() function which counts the number of elements
If we use len on the walls variable, this will be written:
len(walls)
and will give as result the number of elements in the list, that is:
4
The print() function and a concatenation
We use the print() function and we make a concatenation between the text "Number of Walls:" and the actual number of walls (using the len() function)
To concatenate the values, they must be of the same type. The number obtained by the len() function being of integer type, we will use the str() function to transform it into a string.
This gives:
str(len(walls))
We concatenate using the + symbol between the two parts of the same type:
'Nombre de murs: ' + str(len(walls)))
And we enter this concatenation in the print() function.
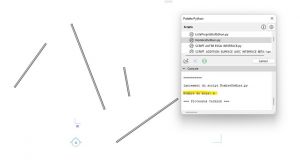
Here is the result:
The "right method".
The script as presented by the Python developer for archicad:
from archicad import ACConnection

conn = ACConnection.connect()
assert conn

acc = conn.commands
act = conn.types
acu = conn.utilities

walls = acc.GetElementsByType('Wall')

print(f'Number of Walls: {len(walls)}')
Compared to the "Raw" method that I presented to you just before:
from archicad import ACConnection
walls = ACConnection.connect().commands.GetElementsByType('Wall')
print('Nombre de murs: ' + str(len(walls)))
It's longer in the official way, but that's for the sake of the script!
The part to keep for any script
In general, all your python scripts for archicad must include these first lines:
from archicad import ACConnection

conn = ACConnection.connect()
assert conn

acc = conn.commands
act = conn.types
acu = conn.utilities
Why do you want to do this? Simply to avoid writing long commands, as seen before. This allows to use acc instead of ACConnection.connect().commands.
This allows the whole script to use only acc.CommandName, acu.UtilityName or act.TypeName.
The instruction "assert" is a code help: if the connection with archicad is not successful, the script will give an error of type "AssertionError" which will allow to understand where the error comes from more easily.
For the text part, concatenation is not recommended in Python, it is advised to use the "f-Strings" method It starts with an f followed by the text between two quotation marks ('). The fixed text is written as is and the variables are written between braces ({}).
Adding functions to our script
Here are some examples of possible script improvements.
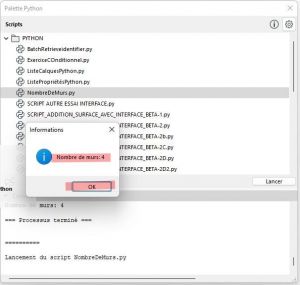
A pop-up message to display the result
Here is the corresponding code:
from archicad import ACConnection
from tkinter import *
from tkinter import messagebox

conn = ACConnection.connect()
assert conn

acc = conn.commands
act = conn.types
acu = conn.utilities

walls = acc.GetElementsByType('Wall')

messagebox.showinfo("Informations",f'Number of Walls: {len(walls)}')
What are the changes?
Importing a new module
We import the tkinter module at the beginning, as well as message box. This is written:
from tkinter import *
from tkinter import messagebox
Using messagebox
To display a pop-up message, we will use the messagebox function previously imported and its showinfo function (other types of functions exist: https://docs.python.org/3/library/tkinter.messagebox.html).
This function asks for at least 1 piece of information; the text that will be displayed in the title of the Pop-Up. The second text will be displayed in the body of the text. These two texts must be separated by a comma.
This gives in our case:
messagebox.showinfo("Informations",f'Number of Walls: {len(walls)}')
Copy the result to the clipboard
In this version, the result is displayed in the console and copied to the clipboard. You just have to do cmd+v or ctrl+v to paste the result where you want.
To find this part of the code, I had to do some google research to find a methodology that doesn't require the installation of an add-on (Pyperclip) on my computer. It appears to be very heavy to use tkinter for this, but it works!
from archicad import ACConnection
from tkinter import *

conn = ACConnection.connect()
assert conn

acc = conn.commands
act = conn.types
acu = conn.utilities

walls = acc.GetElementsByType('Wall')
text = f'Number of Walls: {len(walls)}'

print(text)

r = Tk()
r.clipboard_clear()
r.clipboard_append(text)
r.after(300, r.destroy)
r.mainloop()
